

How to reduce AWS Web Hosting Fees for Non Profits, Charities, and Open Source Projects
Introduction
Are you running a website using AWS (Amazon Web Services) for a non-profit, charity, open-source, or some other kind of “for the greater good” cause and wondering to yourself “this is costing me a fortune!“? If so, then do read on.
I created this website in AWS in 2016. At that time, I was fairly new to AWS, having played with it more casually prior to that and I was at the stage that I felt confident to host a website in AWS.
For simplicity, I pretty much avoided anything complicated. So I started with a t2.nano Linux Bitnami instance, which gave me a Linux server, with WordPress pre-installed. Critically, I created it using the “On Demand” pricing; more on this later.
I soon realised a nano was a bit too small in terms of the amount of RAM provisioned so I upped the instance to a t2.micro, which gave me double the RAM for only a small monthly increase in price. One of the benefits of “On Demand” and its great that you can do things like this so easily in AWS, or any of the cloud providers for that matter.
I then wanted to configure the site for HTTPS and quickly determined that AWS, again conveniently, can manage SSL certificates for you too. You simply generate a certificate using the Certificate Manager and AWS will auto renew it. Better still, the certificate is free! “Brilliant”, I thought, as it was saving me a fair sum each year by not having to buy one through the usual channels. But, I soon realised that in order to actually use it, and to deliver https content through it, you needed an AWS Application Load Balancer configured with Target Groups. Already things were now getting more complicated, but not unrealistically so. I soon got that working, and https content was being delivered throughout.
So, I was using On-Demand instances and a Load Balancer, and my website was rosy. To the credit of AWS, when you just want to get things done, it is a great platform. Arguably the best. But, you do pay for the convenience, and in order to make some savings, you have to get your hand dirty a bit. Again, to their credit, you are not prevented from trying to do things differently even if they are more affordable. In fact, the AWS dashboards and billing sections even encourage you to do that, and steer you in that direction.
Going Live
Roll on a month, and I got my first bill of the new setup. It was upwards of £30 for this website, and around $100 for all 3 of the sites I run in AWS. That was a bit of a shock, but I figured it was OK as I get a donation or two here and there which would likely cover it, and I also figured my time was better spent elsewhere than trying to save £30 a month. And I am fortunate to have a regular job and dropping £30 a month for a stable and reliable website to deliver my project was not too daunting, even though it was undesirable.
However, over the next few months, and as months became years, I noticed this was not really working like that. Donations fluctuate. Sometimes, and more often than not, I don’t get any donations (though I am appreciative to those who have donated). So it frequently costs me £30 to run the website. So it costs me money, as well as my time, to deliver QuickHash-GUI…for free. Obviously this is not ideal in some ways, and people like my wife think it is almost wrong and she exclaims we could be sat on a boat if I charged £1 for every download!
And so over 2020, I made efforts to redress this balance and put some work in to working out how, and where, I could reduce these web hosting costs.
Reducing My Monthly Costs
Discarding Load Balancers and Using Lets Encrypt
So my attention was first brought to Load Balancers. Now in the typical sense, a Load Balancer is used to balance the load :-) QuickHash-GUI gets a moderate traffic flow of several hundred users a day, or about 10K a month give or take, but it is no Facebook or YouTube, lets face it! So it really doesn’t need a mechanism to balance the load, except, for delivering https. If Quickhash-GUI ever gets featured on the BBC website or something, then I might regret not having a load balancer, but I can’t see that happening anytime soon.

So how could I remove the need for the Load Balancer but still get https delivered? The answer to that is using Lets Encrypt with the built-in Bitnami script that comes with it:
sudo /opt/bitnami/bncert-toolIdentifying this was my first big achievement, because I had looked at Lets Encrypt before, but I was unsure how it integrates, or how to integrate it. Having followed the script process, which is easy to follow, I was then able to turn off the load balancer, then redirect the Route 53 domain name settings to point to the server IP address instead of the alias for the Load Balancer and the Lets Encrypt and Bitnami configuration took care of directing all http traffic to https traffic from there. I then instantly saw nearly 50% reduction in my forecast AWS costs, just by ditching the Load Balancer.
So then I looked further to see where else I could make more savings.
AWS Savings Plans, and AWS Reserved Instances
The answer to that, for me, was in the form AWS Savings Plans. Though readers should also explore AWS Reserved Instances which deliver similar savings and may be more suitable for your use case.
Recalling back to my earlier introduction, you’ll recall that, by default, an instance is spun up using the On Demand pricing model. This means you have complete control of your server(s), where you want them in the AWS infrastructure, how powerful they are, and so on. You can move them, increase their power, or reduce their power at will. It is a highly flexible and convenient model….if you need that.
As it turned out, though, when you run a fairly regular website as I do, you don’t really need the flexibility of On Demand. I had run this website for 3.5 years by 2020 using the same instance type, in the same availability zone. And this where Savings Plans can, and would, have helped. What these are is a commitment, or contract if you like, to agree to use what you have for the next year, or 3 years. By doing this, it enables AWS to better plan its demand for the coming period, and for this reward, they pass on savings to you. From the AWS website, Nov 2020 :
- “EC2 Instance Savings Plans provide the lowest prices, offering savings up to 72% in exchange for commitment to usage of individual instance families in a region (e.g. M5 usage in N. Virginia). This automatically reduces your cost on the selected instance family in that region regardless of AZ, size, OS or tenancy. EC2 Instance Savings Plans give you the flexibility to change your usage between instances within a family in that region. For example, you can move from c5.xlarge running Windows to c5.2xlarge running Linux and automatically benefit from the Savings Plan prices.“
So I accessed this in the Billing portion of the AWS dashboard, and started to configure the Savings Plan. In some cases, you may also see “Recommended Savings Plans” that may suggest a plan for you, based on your existing usage. Note though that it appears to base that recommendation on traffic demand, and not the demands of your web site applications, like WordPress themes etc.
The critical part of this process is to ensure you enter the value per hour of the instance you need for the Savings Plan you want. So for example, if you use a t2.micro that costs $0.0104 p\hr on On Demand, the (current) Saving Plan price is $0.0075 p\hr. So you enter that figure (0.0075) into the configuration, and not the On Demand price. And you can also opt to either pay upfront, or partial payment, or no upfront payment and have it all calculated monthly. The biggest savings come with an all up-front payment. Either way, once you click “Buy”, the savings plans are automatically applied to your account and the savings calculated monthly based on how many instances you have and how many savings plans you bought. If you run 3 websites (as I do) I repeated this step for each one of my websites.
As soon as I did this, my already reduced monthly cost (by discarding load balancers) was further reduced by about another 40% or so.
So if you are like me, and you are looking to save AWS costs for running a free, non-profit, charity, or open-source website, then look to adopting Lets Encrypt for your HTTPS and sign up to AWS Savings Plans (or Reserved Instances if that suits you better).
The outcome
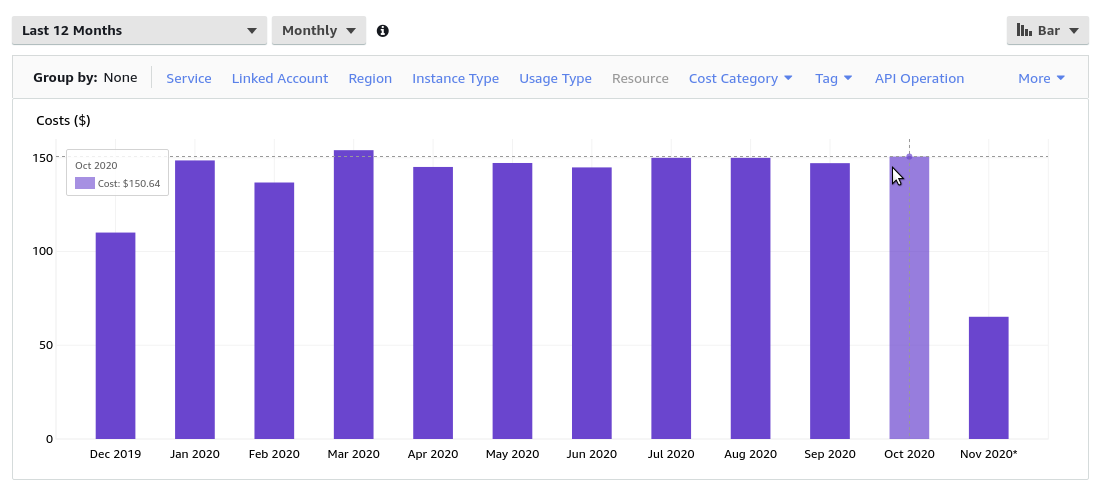
So the chart below display my AWS usage in dollars, for 3 websites (of which this website is one of them), for the last year, after I had applied the techniques above to all three of them, you see a big drop in November. The chart below that shows the various services I used over the last year broken down by colour and type.
As you can see, my monthly usage for all three websites has dropped from about $140 a month, to about $60. And it is worth noting that $20 a month is fixed, as it pays for 4 AWS Workmail e-mail accounts (the yellow line in the bar graph) on one of my other websites, and one AWS Workmail account for this website. So I can’t do much about that, easily. So when you consider that of the $140 original monthly fee, $20 of that was for Workmail accounts. My bill is now $60 a month, of which $20 is still for workmail accounts, as they have not been changed or reduced. So on that basis, if we take the $20 out of the calculations, what we had originally was :
$120 a month for
- 3 x t2.micro instances,
- 3 x Load Balancers,
- 3 x Target Groups,
- 3 x Route 53 policies
- 3 x data movement computations and storage
Now it is $40 a month for
- 3 x t2.micro instances,
- 3 x Route 53 policies and
- 3 x data movement computations and storage
So about 66% reduction in monthly AWS fees. And if you recall, just this one website was costing me about $30 a month before. I estimate it is now costing me about $10, give or take. I guess I need to work out a cheaper way of using e-mail now! And I also need to dig down on that green bar labelled “Others”, as that seems to have gone up!!
I hope this is useful to some of you other heroes who dedicate your time and effort to help others, in whatever form that may be. If you have any extra details to share, that are helpful, do comment below.


Leave A Comment